Thursday, June 28, 2012

Bark Dust is Going Down...

Liz picked up a yard and a half of bark dust when she came to help with the sod.  I spread that out over lawn cloth tonight.  It took almost the whole roll to cover the three sides that we are planning to eventually put stone raised beds.  Then I started the farthest away from the gate and started laying it on thick.  In some of the pre- photos, you might be able to see that the yard slopes back towards the fence away from the lawn on all three sides. 
So, I have to lay it thick to bring it up the the level of the lawn.  Hope the dogs poop and pee in that!  You can see in the South-facing picture the two burns spots I have already.  Mutts. 
I'll pull it way from the bottom of the fence when I get it all down - eventually there will be a stone pathway along the edge of the fence all along the perimeter.

Wednesday, June 27, 2012

The Sod is Down!!!

Since Tom finished Monday evening, I called and had sod delivered on Tuesday.  1,000 square feet from Oregon Turf and Tree.  That is 100 rolls! 
The backyard was ready, they had smoothed out the top soil and I marked off the edges with straight lines. 
I carted 5 rolls back at a time and started along the patio.  There were about 10 rolls per length of the backyard, here's what almost two rows look like.  I used the plywood to step on walk around on so I wouldn't divet the moist topsoil or the sod. 
Here's 500 square feet.  So pretty!  By then the top soil had dried out enough and I had gotten my technique down so I didn't need the plywood "lily pads" any more. 
The sod is down!  I used almost 900 square feet of the sod. 
Liz showed up and helped out too - I had the kinks worked out of the system so she stepped in and un-rolled and matched edges while I carted in the rolls.  We knocked it out!  Thanks Liz!!! 
The sprinklers run great - had to run them to water as soon as I got the sod down since it managed to not rain all afternoon.  Figures. 
And, I couldn't resist taking this photo of our supervisor: Molly. 


Tuesday, June 26, 2012

A Pregan Recipe

This recipe is from Barbara’s blog, That was vegan? With a couple of tweaks, taking it out of the vegan realm and putting it back in the vegetarian realm.  I don’t know if I’ll ever leave my dairy products.  I may cut back, but cutting out is not an option right now.  Baby steps – I’ll stay in my pregan stage for now.  She takes the original Cowboy Casserole and lightens it up, removing the heavy cream of mushroom soup and the meat.  The only major tweak I did was use cheddar cheese instead of Daiya.  Her recipe is here and you can take that and use (or not) the tweaks I made to make your own.  I won’t go through the whole thing – I prefer the photos anyways! 
All the ingredients were pretty simple.  Tofu, bbq sauce, Sriracha chili sauce, red onion, bell pepper, pinto beans (reduced sodium), vegetarian baked beans (just as good, just without that freaky piece of fat floating around in the pork ones), diced green chilies, cheddar cheese and sweet potato tots (YUM). 
I baked the tofu in the same baking dish I was going to make the casserole in, I wanted to make sure I kept all the yummy sauce in there! 

While the tofu baked, I sautéed the veggies,

then mixed them in with both beans and the chilies (I use the bigger, 7oz can of chilies). 

Then into the baking dish with the tofu and mixed up well.  Topped with the shredded cheddar cheese (I’m not going to apologize for all that cheese, but will be cutting back.  Eventually.) and the sweet potato tots. 

All baked up and yummy!  When she says it makes 8 servings, she means it!

Monday, June 25, 2012

Genesis Day Five and a Garden Mystery Solved?

They finished the backyard today!  I have sod coming tomorrow so I am going to do my best to get time off and get it laid ASAP.  The control boxes are all covered back up in their little spot. 
The two that did most of the work with a view from the back gate. 
The strip along the sidewalk got a little bigger - if I have extra sod I may put it there... 
The backyard is nice and smooth - the girls are just begging to go mess it up and roll in the manure they have mixed into the top soil. 

They made a little gravel sink for the down spout.  Tom said it is about 2.5 ft deep and 2.5 ft around - scary if you ask me.  The ground is already yucky, it would take me ALL DAY just to pick that hole out with a huge pick axe. 
The first Patty Pan is coming on. 
The first Yellow Squashes are also coming on. 
The snow peas are going crazy - can you count how many there are? 
I found this baby cucumber laying out in the dirt by the sidewalk...can't figure out if it is from a tail or a crazy paw.  Any thoughts?

Sunday, June 24, 2012

A Garden Update and Some Furry Photos

I was gone all day yesterday so the girls spent the day with Grandma Liz, which they love.  They lazed today while I sewed a little wallet, cooked up a vegetarian chili and cowboy casserole and putzed in the garden.  Here are some photos of them and the garden.
First tomato of the season!  Yellow Taxi
Second tomatoes of the season.  Sweet Pea Currant 
Second cucumber...the first mysteriously disappeared at this size 
Zucchini, Yellow Squash and Patty Pans 
Molly cat - chillin on the patio in the camp chair by the door
Oakleigh sunnin with her "stick" Grandma Liz got her at Costco 
Annie in the backyard inspectin'.  (this was earlier this week, but she managed to hide from the camera all day and I couldn't leave The Bug out!) 

Saturday, June 23, 2012

Lessons in Free Motion Quilting

Today I took my finished Ranger’s Pride baby quilt top and the rest of my supplies up to Diane’s in Tigard to try my hand at something other than an all-over design (pantograph, stipple or 
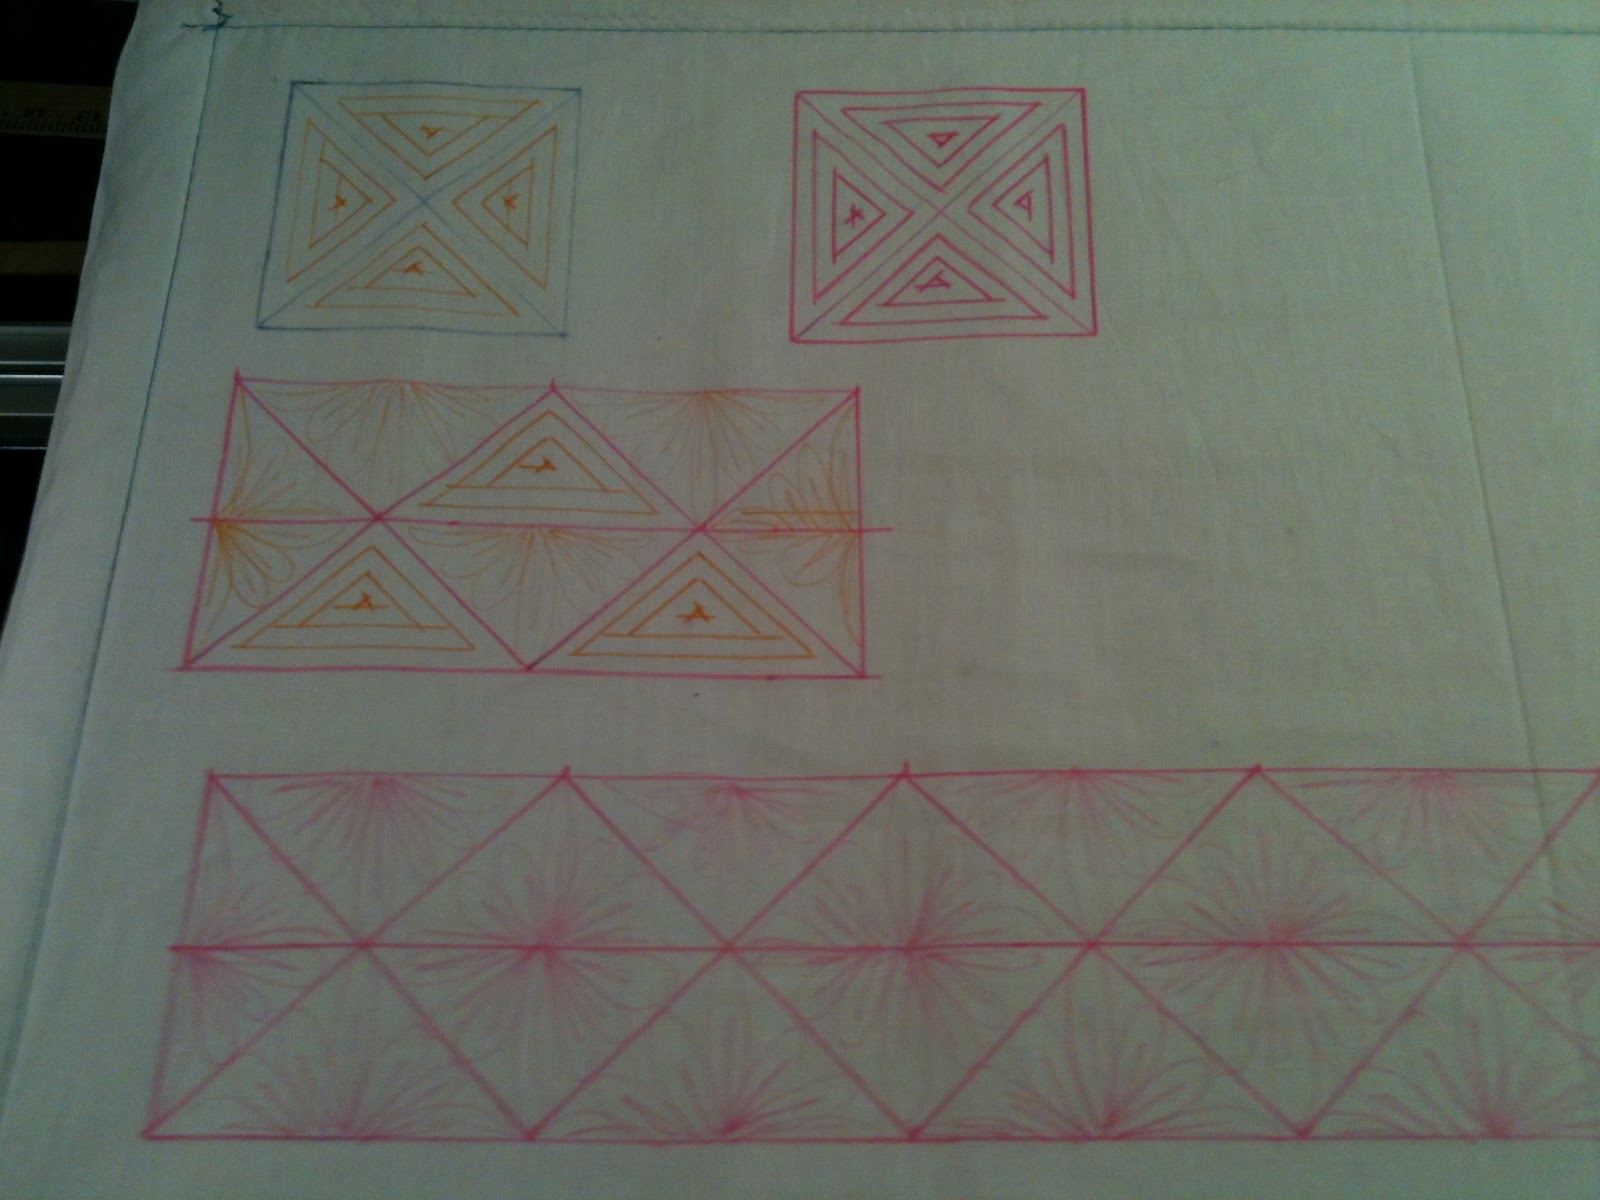
meander).  I sketched the design earlier in the month on a scale drawing of the pattern and marked the quilt with a CloverFine Tip White Marking Pen in the design.  On the drive up, I started to doubt myself so I decided to get some practice muslin and draw out my design on the muslin and practice quilting over the design so I could get used to the shapes, refine my techniques (as raw as they are) and make some tweaks to the design.  I sketched out a little bit of each element on the muslin and went to work.   
I’ve got triangles that go in the borders and the smaller pinwheels. 
There are flowers that go in the borders and the larger pinwheels. 
I’ve sketched both together in the way they’ll be in the border.  I’ve also got larger flowers at different angles and a filler with hearts and wavy lines (photos not available). 
The finished triangles are a little different from the original sketch.  You can see the lines and the stitches: originally it was 3 triangles inside the larger, now it will be a triangle spiral. 
The smaller flowers were fun to do, I am definitely better going to the right and right-side up than I am going to the left and up-side down.  I started out stitching the lines (I’ll do the same by stitching in the ditch on most of the quilt). 
I also learned I’ll have to stop the machine when I move my body – it is too sensitive to just hold on to and it wiggles and travels in wrong ways. 
I had a lot of fun with the rows and rows of flowers. 
Here is a close-up of it. 
I like how they look all together – one at a time you can see the goofs and funkiness of each flower.  When they are all together, you actually get a pretty neat look, mainly since they aren’t all the same cookie-cutter pieces (but I do what to get them more uniform some day!).  Isn’t the whole far-out picture look neat?  You just see the color designs, not the individual ones. 
The rows of triangles and flowers were fun too – I can definitely say I like the free motion work better than the ruler work. 
Here are the rows of flowers and the rows of triangles and flowers together. 
The larger flowers turned out ok – definitely going to have to work on them since they are larger than the smaller ones and they take more room up on the quilt. 
You can see how wonky they are up close. 
The filler was originally just lines with hearts at the end, but I added some wavy lines to the straight ones and some swirlies to the hearts. 
Here is the finished practice muslin. 
I can’t wait to get on the real thing next weekend!  Here’s to not having too much to pick out :o).